So you wish to have the convenience of a spigot to make tasks such as gardening or car washing easier? Adding a spigot to your good pump might seem daunting, but it’s a surprisingly easy process if you know How to Add a Spigot to My Well Pump.
In this blog post, we’ll guide you step by step through adding a spigot to your well pump, from gathering the necessary tools to turning on the water for the first time.
We understand that the idea of installing a spigot may sound intimidating, but we promise that with this guide, you’ll be able to complete the task confidently and without any difficulties. So, let’s get started and bring more convenience to your daily life with a new spigot for your well pump!
How to Add a Spigot to My Well Pump
This is the process to add a spigot to my well pump.
Required tools
Now, let’s get started on the installation process. Here’s what you’ll need:
- A spigot kit
- A drill
- A pipe wrench
- Teflon tape
- A hacksaw
- A marker
- A level
- Safety glasses
Step 1: Turn Off the Power and Water Supply
Before starting any work on your well pump, you need to turn off the power supply and water supply. This will help ensure your safety and prevent any accidents. You can turn off the power supply by locating the circuit breaker that controls your well pump and switching it off. To turn off the water supply, you can locate the valve that controls the water supply to your well pump and shut it off.
Step 2: Remove the Well Cap
The next step is to remove the well cap. The well cap is usually located above the well pump and covers the opening to the well. To do it,
- Use a wrench or pliers to remove the bolts that hold the well cap in place.
- Once the bolts are removed, lift the cap off.
- Then set it aside.
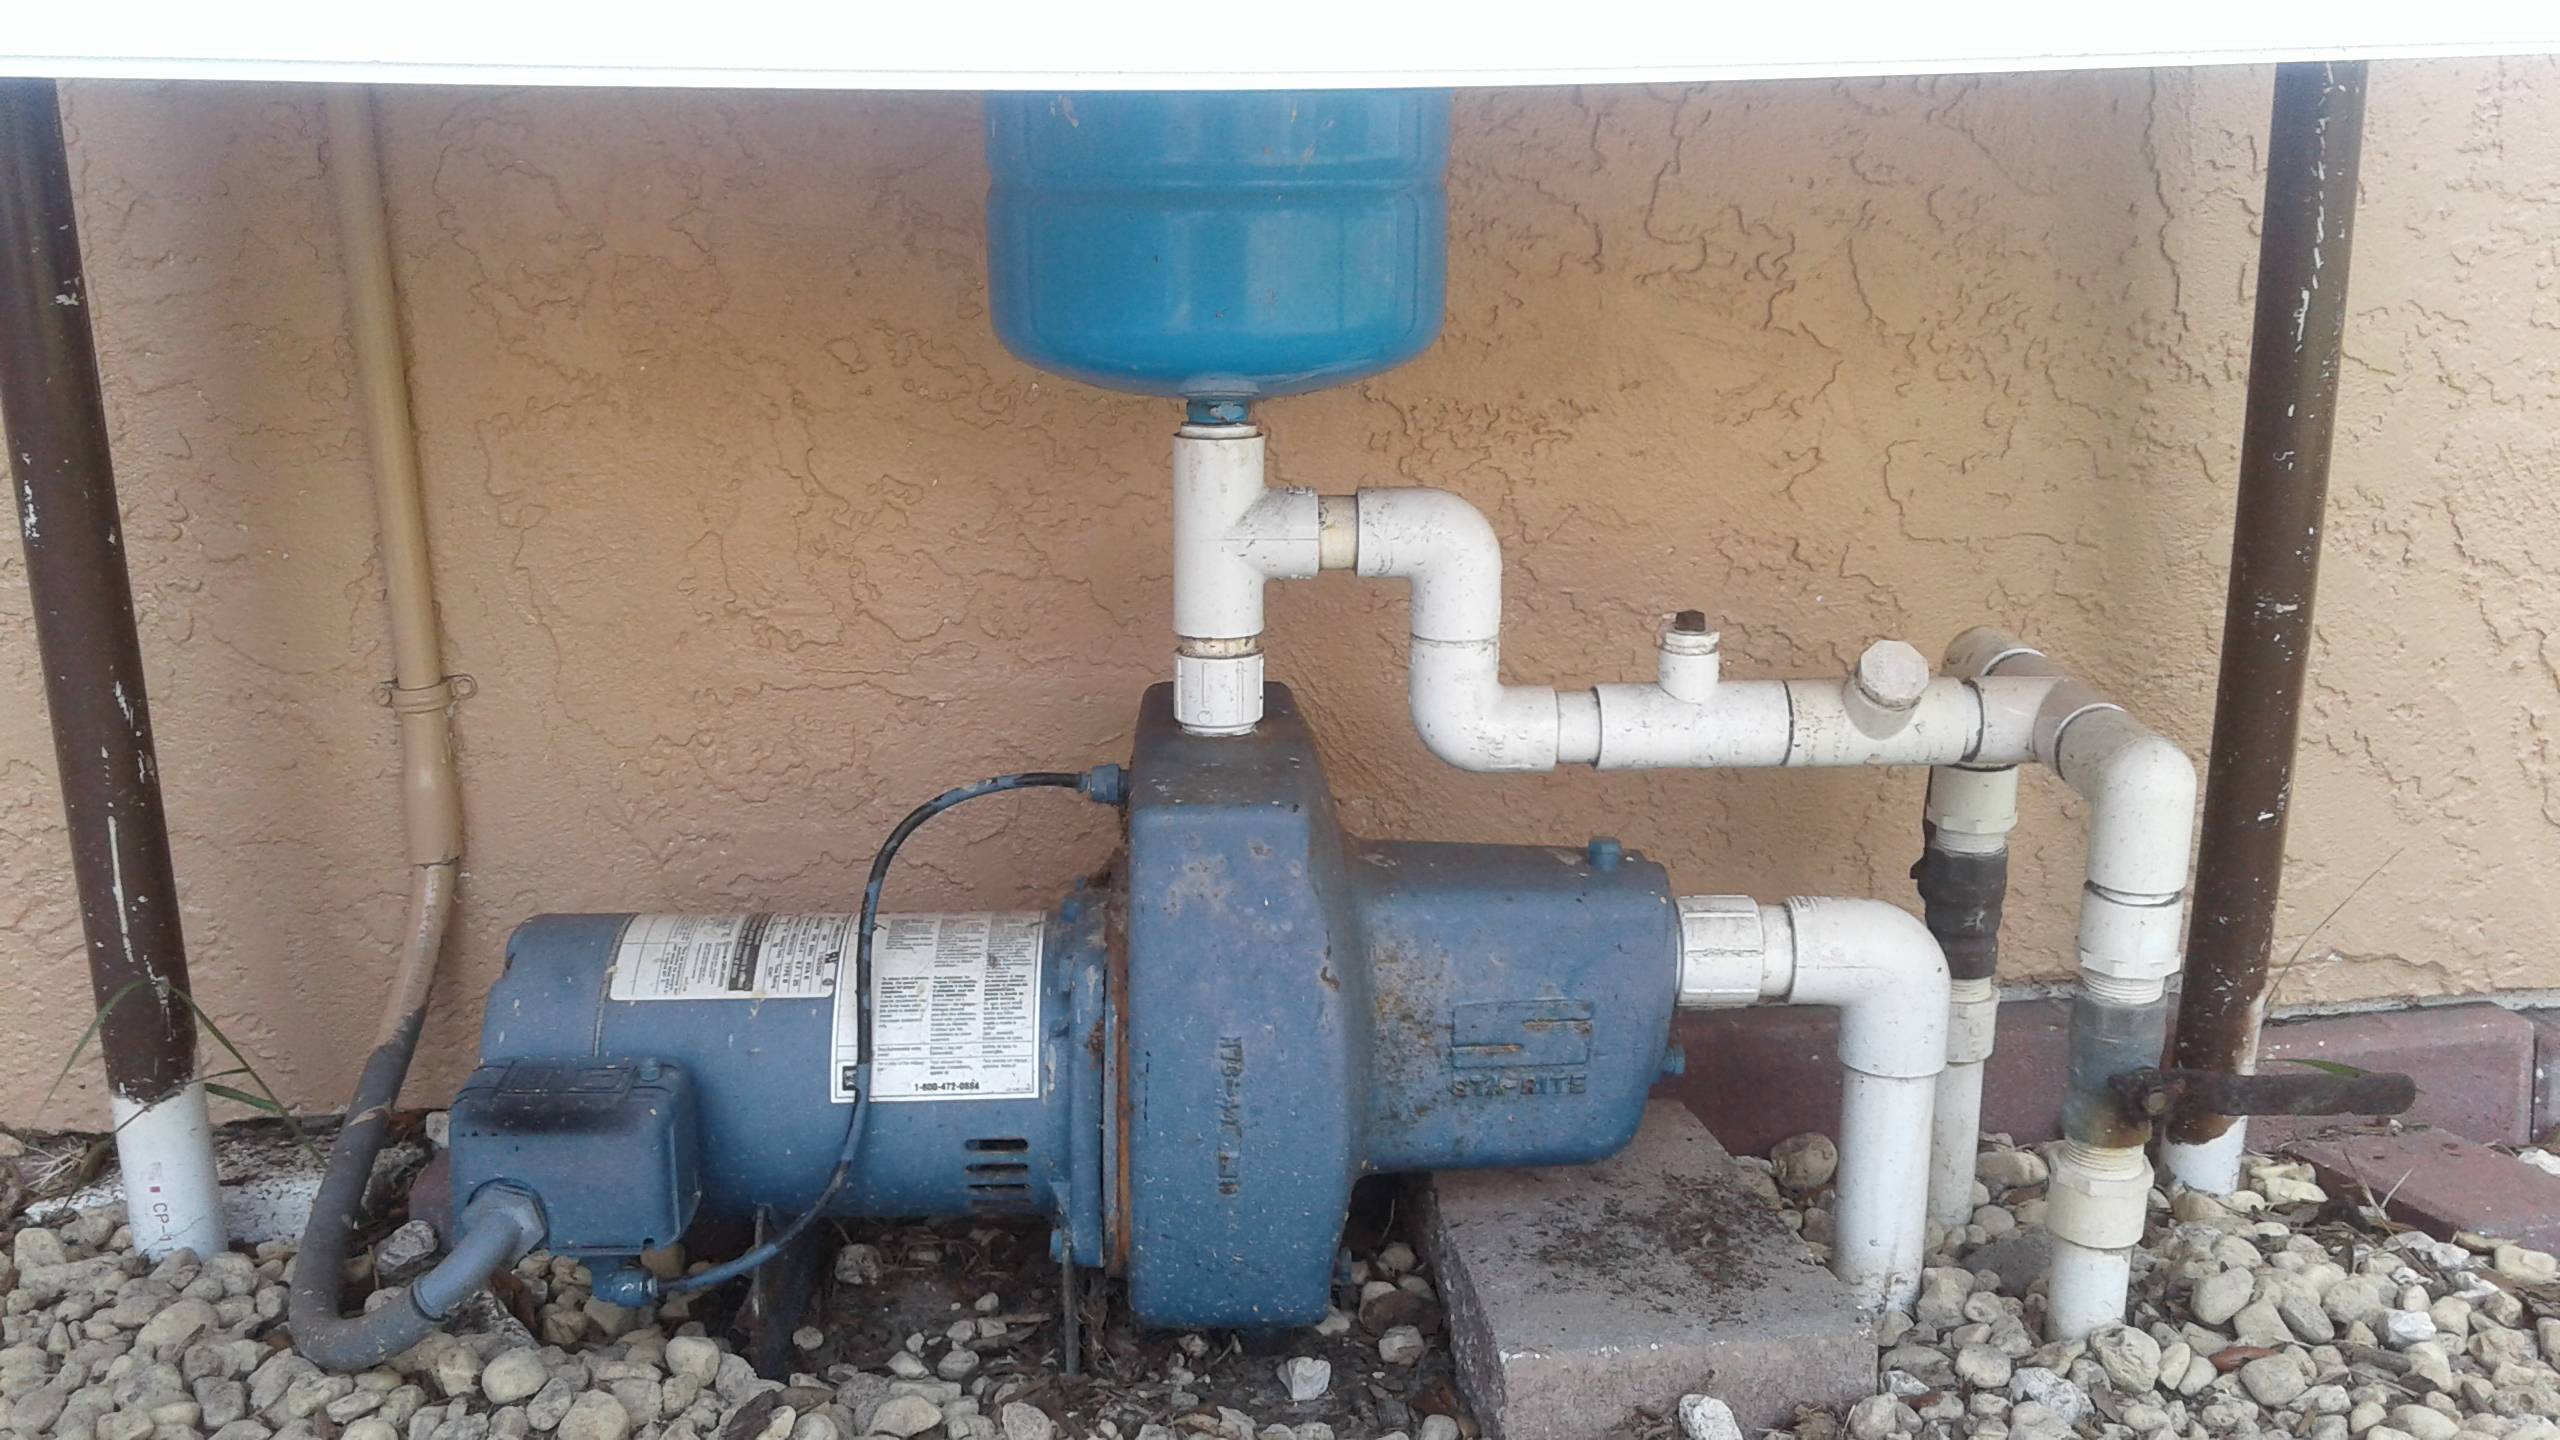
Step 3: Attach the Spigot
Once the well cap is removed, you can attach the spigot to the well pump. To do it,
- Use a T-adapter to connect the spigot to the well pump.
- The T-adapter should be screwed onto the top of the well pump, and the spigot should be screwed onto the side of the T-adapter.
- Make sure to use thread seal tape on all the connections to prevent any leaks.
Step 4: Install the Pressure Gauge
After attaching the spigot, you will need to install a pressure gauge. The pressure gauge will help you monitor the pressure of the water in your well pump. You can install the pressure gauge by screwing it onto the top of the T-adapter. Again, make sure to use thread seal tape on all the connections.
Step 5: Replace the Well Cap
With the spigot and pressure gauge installed, you can now replace the well cap. Make sure to align the bolts with the bolt holes and tighten them securely with a wrench or pliers.
Step 6: Turn On the Power and Water Supply
Now that everything is in place, you can turn on the power supply and water supply. To do it,
- Start by turning on the water supply and letting the well pump fill with water.
- Then, turn on the power supply and wait for the well pump to start working.
- You can test the spigot by turning it on and checking if the water comes out.
Safety Tips
- Always wear safety glasses and gloves when working on your well pump.
- Make sure to turn off the power and water supply before starting any work.
- Avoid touching any exposed wires or electrical components.
- Use caution when working around the well pump to avoid falling in.
How to install a water line, filter and spigot to a new well.
- Start by shutting off the power to your well pump
- This will ensure that you don’t accidentally electrocute yourself while working on the wiring
- Next, remove the cover from your well pump so that you can access the wires inside
- Find the wire that leads from the switch to the motor of your well pump and cut it in half using a pair of wire cutters
- Strip ½ inch of insulation off of each end of both halves of the wire using a wire stripper
- Take one half of the wire and twist it around one terminal on a spigot connector clockwise until it is tight
- Do not overtighten or you could strip the wires
- Repeat this step with the other half of the wire and remaining terminal on the connector
- Spigot connectors can be found at most hardware stores near where plumbing supplies are sold
- 6 Connect one side of a short length of electrical tape around both wires where they meet at the terminals on the connector then twist them together clockwise until they are tight before taping them securely in place with another layer of tape
- This will keep them from coming loose over time due to vibration from your well pump
- Allowing water to come into contact with live electrical wires could cause serious injury or death so be sure to use caution and consult with an electrician if you are unsure about any part of this project
Well Head Spigot
As anyone who has ever had to deal with a clogged sink knows, the humble spigot plays an important role in our everyday lives. But what exactly is a well head spigot and how does it work?In short, a well head spigot is a device that regulates the flow of water from a well.
It is usually located at the top of the well, near the water source. The spigot consists of two parts: a valve that controls the flow of water and a handle that is used to open and close the valve.The well head spigot is an essential part of any well system.
It not only controls the amount of water that flows from the well, but also prevents contaminants from entering the water supply. When properly maintained, a well head spigot can last for many years without needing to be replaced.
How to Install a Water Spigot Outside on a Mobile Home
Assuming you would like a blog titled “How to Install a Water Spigot Outside on a Mobile Home”:If your mobile home doesn’t have an existing water spigot and you want to install one, there are a few things you need to take into account. The main concern is whether or not your mobile home is equipped with the proper plumbing.
Most modern mobile homes have the same type of plumbing as traditional houses, but some older models may not. It’s always best to check with a professional before attempting any major plumbing project.That said, installing a water spigot outside of your mobile home is generally a pretty straightforward process.
Here are the basic steps:1. Locate the nearest water line coming into your mobile home. This is usually located near where the main water shut-off valve is located.
2. Cut into the water line using a hacksaw or similar tool. Make sure to turn off the water before doing this!
3. Attach a T-fitting to the newly cut section of pipe, then attach one end of a length of hose to the T-fitting and run it to where you want your new spigot installed.
4. Screw the new spigot onto the other end of the hose, then turn on the water and test for leaks at all connections points. If everything looks good, you’re done!
Water Spigot before Pressure Tank
If you have a water spigot before your pressure tank, it’s important to know how to properly maintain it. Here are some tips:1. Check the spigot regularly for leaks.
If you notice any dripping, tighten the packing nut until the leak stops.2. If the spigot is hard to turn, lubricate the packing nut with petroleum jelly or plumber’s grease.3. To prevent corrosion, wrap Teflon tape around the threads of the packing nut before screwing it on tight.
4. If your water pressure is low, check to see if there is sediment build-up in the pressure tank. If so, flush out the tank according to the manufacturer’s instructions.
Cost to Add Outdoor Spigot
Assuming you would like a blog post discussing the cost of adding an outdoor spigot:The cost of adding an outdoor spigot can vary depending on a few factors. The most important factor is whether or not you already have plumbing running to the desired location of the spigot.
If so, then the job will be much less expensive than if you need to run new plumbing. Other factors that can affect cost include the type of siding on your house (vinyl siding is much easier to work with than brick, for example), and whether or not you need to install an anti-freeze kit (if you live in an area where freezing temperatures are common).Generally speaking, though, you can expect to pay anywhere from $100-$500 to add an outdoor spigot.
Of course, it’s always best to consult with a professional plumber before starting any project like this, as they will be able to give you a more accurate estimate based on your specific situation.
How to Add a Water Spigot Outside
One of the handiest things you can add to your home is an outdoor water spigot. Having one installed will make watering plants and washing cars much easier and more convenient than lugging around a hose all the time. Here are step-by-step instructions for adding an outdoor water spigot to your home:
1. Locate the water main for your home. This is usually in the basement or crawl space. Once you’ve found it, turn off the valve that controls the flow of water into your home.
2. Cut a hole in the exterior wall of your home where you want the spigot to be located. Make sure the hole is big enough to accommodate the spigot’s installation kit.3. Install a shut-off valve on the pipe leading from the water main into your home (this step may not be necessary depending on what type of spigot you’re installing).
4. Attach a length of garden hose to the shut-off valve, then run it through the hole in your exterior wall and out to where you want the spigot to be located.
5. Installthe spigot according to manufacturer’s instructions, then turn onthe shut-off valve so water flows throughthe new spigot (again, this step may vary depending on which typeof spigot you’re using).
Credit: www.youtube.com
Can You Hook Up a Garden Hose to a Well Pump?
It is possible to hook up a garden hose to a well pump, but it is not recommended. Doing so can damage the pump and lead to costly repairs. Additionally, it can be dangerous if not done properly, as there is a risk of electrocution.
If you do choose to do this, be sure to consult with an experienced professional first and follow all safety precautions.
How Do You Add an Outside Water Spigot?
Adding an outdoor water spigot is a relatively easy home improvement project that can be completed in a few hours. The most difficult part of the job is usually digging the hole for the new spigot, which will need to be done with a shovel or power auger. Once the hole is dug, installing the new spigot is simply a matter of connecting it to the main water line using PVC pipe and fittings.
If you’re not comfortable working with plumbing, it’s probably best to hire a professional to handle this job. Otherwise, just follow these simple steps and you’ll have your new spigot up and running in no time:1. Begin by shutting off the water supply to the area where you’ll be working.
This may mean shutting off the main water valve for your entire home. Once the water is shut off, open all of the faucets in your house so that any remaining water can drain out.2. Next, use a shovel or power auger to dig a hole for your new spigot.
The hole should be big enough to accommodate both the spigot itself and any pipes or fittings that will need to be connected to it.3. Once the hole is dug, install any necessary piping or fittings between your new spigot and the main water line. Be sure to use PVC pipe and connections rated for outdoor use; standard indoor plumbing materials will not hold up well in wet or humid conditions outdoors.
4 If you’re not sure how to make these connections, consult a plumbing diagram or ask someone at your local hardware store for help before proceeding further.5 Finally, install your new outdoor spigot by screwing it into place (or following whatever manufacturer’s instructions are provided). Once it’s installed, turn on your home’s water supply and test out your new spigot by giving it a good drink!
How Much Does It Cost to Add a Water Spigot to a House?
Adding a water spigot to a house is not a very expensive project. The average cost of materials and labor is between $100 and $200. However, the exact cost will depend on the type and location of the spigot you choose, as well as any additional plumbing that may be required.
How Much Does It Cost to Install an Outdoor Water Spigot?
It costs between $100 and $200 to install an outdoor water spigot, depending on the complexity of the job. If you need to add a new water line to your home, the cost will be on the higher end. But if you’re simply connecting to an existing line, the cost will be lower.
Either way, it’s a good idea to hire a professional plumber to handle the job.
FAQs
Can I install a spigot on any well pump?
A: Not all well pumps are suitable for a spigot installation. Check with a professional to ensure that your well pump is compatible with a spigot installation.
How do I prevent leaks when installing a spigot?
A: Use thread seal tape on all the connections to prevent any leaks. You can also check for leaks by turning on the spigot and checking for any water leakage around the connections.
Do I need any special tools to add a spigot to my well pump?
A: You will need a few basic tools such as a drill, wrench, PVC glue, Teflon tape, and a hacksaw.
Can I add more than one spigot to my well pump?
A: Yes, you can add multiple spigots to your well pump, but you will need to ensure that your well pump has enough capacity to handle the additional demand.
Can I use a different type of spigot for my well pump?
A: Yes, there are many types of spigots available on the market, but it’s important to choose a spigot that is suitable for use with a well pump and can handle the pressure and flow rate.
Can I add a spigot to a shallow well pump?
A: Yes, you can add a spigot to a shallow well pump, but the process may be slightly different, and you may need different materials.
Can I add a spigot to a submersible well pump?
A: Yes, you can add a spigot to a submersible well pump, but the process may be slightly different, and you may need different materials.
Can I install a spigot on an existing well pump system?
A: Yes, you can install a spigot on an existing well pump system, but you will need to ensure that the well pump system can handle the additional demand.
Can I use a garden hose with my well pump spigot?
A: Yes, you can use a garden hose with your well pump spigot, but it’s important to choose a garden hose that is suitable for use with a well pump and can handle the pressure and flow rate.
Can I add a shut-off valve to my well pump spigot?
A: Yes, you can add a shut-off valve to your well pump spigot, which can help prevent leaks and ensure that the water flow is regulated
Conclusion
In conclusion, adding a spigot to your well pump is a relatively easy process that can provide you with the convenience of easy access to water on your property. By following the step-by-step guide we have provided, you can confidently add a spigot to your well pump without the need for professional assistance.
It’s important to remember to follow safety measures and take all necessary precautions while working with water and electricity. With the right tools, materials, and guidance, you can successfully complete this project and enjoy the benefits of having a spigot attached to your well pump.