Building a pool waterfall wall is a great way to add beauty and value to your home. Here are some tips on how to do it:1. Choose the right location for your waterfall.
It should be close to the pool, but not too close that it overpowers the look of the pool.
2. Mark out the area where you want the waterfall to go with stakes and string.
3. excavate the area for the pondless waterfall, making sure that it is deep enough and has sloped sides so that water will flow properly.
4. Line the excavation with PVC liner, making sure that there are no holes or punctures.
5. Install a pump in the bottom of the excavation and connect it to a reservoir above ground level using PVC pipe.
6Fill the excavation with gravel, then rocks of varying sizes until you reach desired height .
7Place plants around base of waterfall for added aesthetics . 8Backfill around plants with soil . 9Turn on pump and enjoy your new poolside feature!
Pool Waterfall Installation
- Find a spot for your waterfall wall
- It should be close to the pool and level with the ground
- excavate the area for your waterfall wall
- The depth will depend on how tall you want your waterfall wall to be
- Lay a foundation of concrete or stone at the bottom of the excavation
- This will support the weight of the waterfall wall
- Build up the walls of your waterfall with blocks, bricks, or stones
- Make sure to use mortar between each layer to keep everything secure
- Create a shelf on top of the waterfall wall for your pump and pond liner to sit on
- This will keep everything in place once you add water to the system
- 6 Finally, add your pond liner and fill it with water from a hose or bucket until it reaches the top of the waterfall wall
Diy Pool Waterfall Kit
If you’ve ever wanted to add a waterfall to your pool but weren’t sure how, a DIY Pool Waterfall Kit is the perfect solution! With easy-to-follow instructions and all the necessary materials included, anyone can create a beautiful waterfall feature in their backyard pool.The first step is to excavate a hole in your pool deck for the waterfall basin.
The size of the hole will depend on the size of the kit you purchase, but it’s important to make sure it’s big enough to accommodate all of the rocks and water without being too obtrusive. Next, you’ll need to install some PVC piping from the pump to the top of the waterfall. This is where the water will flow from, so be sure to follow directions carefully.
Once everything is hooked up, it’s time to start filling in the basin with rocks. Be creative with this part – there are no rules! – and arrange them however you like.
Once everything is in place, turn on the pump and watch as your very own backyard oasis comes to life before your eyes!
Pool Waterfall Kit
A pool waterfall kit is a great way to add some pizzazz to your pool without spending a lot of money. Waterfalls are relatively easy to install and can be done in a weekend. Here’s what you need to know about installing a pool waterfall kit.
The first thing you need to do is determine where you want the waterfall to be located. It’s important to make sure that the location is level so that the water flows evenly over the rocks. Once you have determined the location, mark out the area with chalk or spray paint.
Next, you need to excavate the area for the pond liner. The pond liner will need to be at least two feet deep in order to accommodate the pump and rocks. After excavation, line the hole with the pond liner and fill it with water.
Now it’s time to install the pump. The pump needs to be strong enough to move all of the water through the system and over the rocks in your waterfall. Once the pump is installed, connect it to a power source and turn it on.
Now it’s time to start putting together your waterfall! Begin by placing large rocks around the edge of your pond liner. Make sure that each rock is stable before moving on to smaller rocks and gravel.
Fill in any gaps between rocks with gravel until everything is nice and even.Finally, attach your hose from the pump tothe top of your waterfall and watch as all of your hard work comes together!
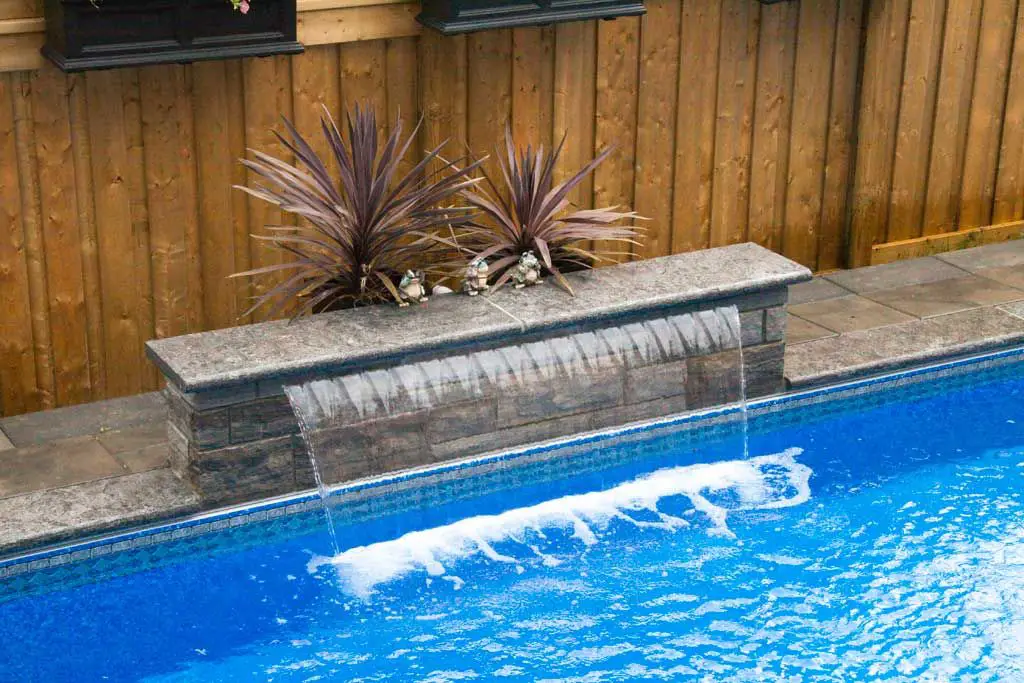
How to Build a Sheer Descent Waterfall
A Sheer Descent Waterfall is a beautiful and serene addition to any backyard. They are also relatively easy to build, with a little bit of planning and the right materials. Here is a step by step guide on how to build your own Sheer Descent Waterfall.
1)Planning: The first thing you need to do is take measurements of the area where you want to install your waterfall. This will help you determine how much material you will need. You should also decide on the height and width of your waterfall.
Once you have all of this information, you can begin shopping for the materials needed.2) Excavation: The next step is to excavate the area where your waterfall will be installed. This includes digging a hole for the pond, as well as trenches for the tubing that will carry water to and from the pond.
Be sure to make these trenches at least 6 inches deep so that they do not collapse when filled with water.3) Installation of Liner: The next step is to install a liner in both the pond and trenches. This will ensure that no dirt or debris gets into the water system.
Make sure that the liner is properly secured so that it does not move when filled with water.4) Pond Pump: Now it is time to install your pond pump. This pump will circulate the water through your system and provide oxygenation for your fish (if you choose to add them).
Be sure to follow manufacturer’s instructions when installing this component.5) Waterfall Basin: The final step in building your waterfall is installing the basin at the top of your waterfall structure.. By adding rocks or other large objects around this basin, you can create additional ledges or shelves for plants or even more fish!
How to Build a Rock Waterfall for Pool
A rock waterfall for pool can be a great addition to your backyard. It can provide a natural look and feel to your pool area and can be a great way to relax and enjoy the outdoors. Here are some tips on how to build a rock waterfall for pool:
1. Choose the right rocks: The first step is to choose the right rocks for your project. You’ll need to find rocks that are durable and that will hold up against the elements. They should also be large enough to create a significant waterfall effect.
2. Create a base: Once you’ve chosen your rocks, you’ll need to create a base for them. This can be done by excavating a hole in your yard or by using concrete blocks. Make sure that the base is level so that your waterfall will look even when it’s finished.
3. Stack the rocks: The next step is to stack the Rocks on top of each other, starting with the largest at the bottom and working your way up. Use mortar or cement between each layer of Rocks to secure them in place. Make sure that each layer is level before moving on to the next one.
Diy Pool Waterfall Pvc
Building a pool waterfall with PVC is a relatively easy and inexpensive project that can add beauty and value to your home. Here are the basic steps:1. Determine the location for your waterfall.
It should be close to the pool so that the water can flow easily into it. You will also need to consider things like sun exposure and wind direction when choosing a spot.2. excavate the area for your waterfall.
The size will depend on how big you want it to be.3. Lay down a layer of gravel in the bottom of the excavation. This will help with drainage.
4. Install a PVC liner in the excavation. This will serve as the walls of your waterfall feature.

Credit: www.youtube.com
How are Pool Waterfalls Built?
If you’ve ever watched HGTV or any other home improvement show, you’ve probably seen at least one episode where they build a pool with a waterfall. It always looks so tranquil and relaxing, like something out of a resort. But have you ever wondered how they actually build those waterfalls?
Well, wonder no more! Here’s a quick rundown of how pool waterfalls are built.First, the pool itself is excavated to accommodate the size and shape of the waterfall.
Next, a concrete footing is poured around the perimeter of the excavated area. This footing will support the weight of the waterfall and ensure that it doesn’t collapse into the pool.Once the footing has cured, construction can begin on the actual waterfall.
A pre-formed shell is typically used for this purpose – think of it like a giant mold that will be filled with concrete. The shell is placed in position and then reinforced with steel rebar before being filled with concrete.After the concrete has cured, it’s time to add some finishing touches to your waterfall.
This includes installing coping (the edge around the top of the waterfall) as well as stone or brick veneer on the face of the falls. Finally, plumbing is installed to bring water to your new backyard oasis and you’re ready to enjoy your very own slice of paradise!
How Do I Add a Waterfall to My Pool?
Adding a waterfall to your pool is a great way to create an oasis in your own backyard. There are a few things you need to take into consideration before adding a waterfall to your pool, such as the size and shape of your pool, the type of materials you want to use, and the budget you have for this project.Once you have all of that sorted out, you can start planning the design of your waterfall.
You’ll need to decide where you want the waterfall to be located in relation to your pool, how tall you want it to be, and what kind of material you want to use for it. Once you have all of that figured out, it’s time to start shopping for materials!The most important part of adding a waterfall to your pool is making sure that it is properly installed and sealed.
Waterfalls can be very heavy, so it’s important that they are installed on a solid foundation. You’ll also want to make sure that all of the joints are properly sealed so that water doesn’t leak through and cause any damage.
Can You Add a Waterfall Feature to an Existing Pool?
Water features can really add a lot of interest and excitement to a pool, and a waterfall is one of the most popular choices. But if you have an existing pool, can you add a waterfall feature? The answer is maybe.
It depends on the design of your pool and the structure of your home. If your pool was not designed with a water feature in mind, it may be possible to retrofit one in. But it will likely be more expensive and may not look as seamless as if it had been part of the original design.
If you’re considering adding a waterfall to your existing pool, talk to a professional pool designer or contractor to see if it’s feasible. They’ll be able to tell you what kind of modifications would need to be made, and whether it’s worth doing given the cost.
What is the Best Rock for Pool Waterfall?
When it comes to choosing a rock for your pool waterfall, there are many factors to consider. The type of rock you choose will depend on the overall look and feel you want to create in your backyard oasis. Here are a few of the most popular types of rocks used in pool waterfalls:
Flagstone: Flagstone is a sedimentary rock that is available in a wide range of colors and textures. It is also one of the most durable rocks, making it an ideal choice for high traffic areas such as pool waterfalls.Travertine: Travertine is another sedimentary rock that has a natural beauty all its own.
This type of rock is often used in travertine pool coping and can add a touch of elegance to any backyard retreat.Granite: Granite is an igneous rock that is extremely strong and durable. It’s perfect for high traffic areas like pool waterfalls because it won’t chip or scratch easily.
Plus, granite comes in a variety of colors so you can find the perfect match for your backyard space.
Conclusion
Building a pool waterfall wall is a great way to add beauty and value to your home. There are a few things to keep in mind when planning your project. First, you’ll need to decide on the height and width of the waterfall.
Second, you’ll need to determine the location of the waterfall. Third, you’ll need to select the materials for the project.Fourth, you’ll need to gather the necessary tools and supplies. Finally, you’ll need to follow the instructions carefully to ensure that your project is a success.