
Check valves are designed to prevent water from flowing backward in a well system. If the valve becomes stuck, there are several ways you can unstick it. Firstly, check if there is any debris blocking the flow and clear it away if necessary.
Secondly, manually open and close the valve several times to loosen any dirt or other material that may be preventing it from moving freely. Thirdly, use a wrench to turn the handle of the check valve clockwise until it stops turning; then turn counterclockwise for one full rotation before repeating this process multiple times. Finally, inspect all O-rings on the valve for damage or wear and replace them as needed.
Following these steps should help unstick your well check valve so you can get your water flowing again!
- Step 1: Locate the check valve
- The check valve is usually located on the outlet side of the well pump system, near where it connects to the water line leading into your home
- Step 2: Shut off power to the well pump and inspect the check valve
- Check for any foreign objects or corrosion that may be blocking its proper functioning and remove them if present
- Step 3: Test run the pump with a garden hose connected to see if flow is restored throught he pipe system by running some water through it
- If not, proceed to step 4
- Step 4: Loosen up any corroded or rusted parts in order to free up movement within them using penetrating oil such as WD-40 or PB Blaster and allow it time to take effect (about 10 minutes)
- Step 5: Reassemble all components back together after cleaning them out from debris, then reinstall all bolts/screws tightly so there are no leaks in your plumbing system caused by loose connections at this point
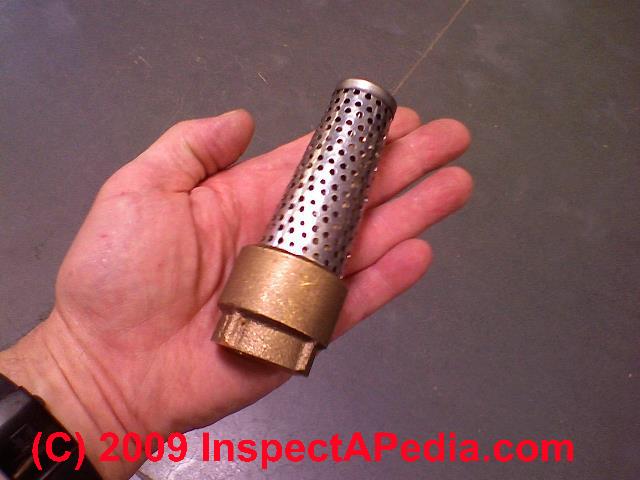
1/2" Brass Swing Check Valve Failure and Partial disassembly
How to Unstick a Well Check Valve Well Pump
If you find yourself with a stuck check valve on your well pump, don’t worry – it’s an easy fix! First, shut off the power to the pump. Then, remove the casing and inspect the valve.
If you see any debris or dirt blocking it, carefully remove them using a screwdriver or similar tool. You may also need to lubricate the moving parts of the valve with some WD-40 to help them move freely again. Lastly, replace any worn out O-rings as needed and reassemble everything back together before turning on your well pump once more.
How to Replace Check Valve on Well Pump
Replacing the check valve on a well pump is an important part of maintaining your system. The purpose of the check valve is to keep water from flowing back down into the well after it has been pumped up and out of the ground. To replace it, first shut off power to your pump at the breaker box, then locate where the pipe enters your pressure tank.
Disconnect this pipe and loosen any clamps that are holding it in place before removing the old check valve. Install a new one in its place using Teflon tape or plumber’s putty around any connections you make, then reconnect everything as it was before and turn on your power.
Shallow Well Check Valve Problems
When it comes to shallow well check valve problems, the most common issues are related to debris getting stuck in the valves or corrosion of the metal components. If debris gets stuck in the valve and is not cleared out, water may not be able to flow properly through the system. Additionally, if there is excessive corrosion of the metal components on a shallow well check valve, it can result in cracks or holes which will also impede water flow.
To avoid these issues, regular maintenance should be performed on all parts of your shallow well system.
Flow Check Valve Stuck Open
Flow check valves are designed to prevent reverse flow of fluids in piping systems. However, if the valve becomes stuck open, it can lead to a variety of problems such as decreased system efficiency and pressure drops that put strain on other components. To avoid these issues, regular maintenance should be conducted and any signs of sticking or resistance should be addressed immediately.
Well Foot Valve Problems
Well foot valve problems can be caused by a variety of factors, ranging from poor maintenance to clogged or damaged valves. In order to prevent well foot valve issues, it is important to regularly inspect the valves and ensure they are free of debris and functioning properly. Additionally, replacing older valves with new ones that feature improved designs can improve the overall performance of your well system.
Check Valve Failure Symptoms
When a check valve fails, the symptoms can be serious and potentially costly. Common signs of failure include water hammering or banging noises coming from pipes, increased pressure on the system due to backflow, and an inability to control flow rate or direction in the system. If any of these symptoms present themselves within a plumbing system, it is important for homeowners to investigate further for potential check valve failure.
Clogged Foot Valve Symptoms
A clogged foot valve can cause a variety of symptoms, including reduced water pressure in the home, strange noises coming from the pipes, and an unusually high water bill. In addition, you may also notice that your hot water is not heating up properly or that there is a noticeable decrease in overall water flow. If any of these symptoms sound familiar to you, it could be a sign that your foot valve is clogged and requires immediate attention.
How to Replace Foot Valve in Deep Well
Replacing a foot valve in a deep well is an important part of maintaining the proper functioning of your water system. The foot valve acts as a check against backflow, and keeps the pressure within your pump balanced. Replacing the foot valve requires you to shut off power to the well pump, disconnect it from its pipes and fittings, remove any sediment or debris that has built up around it, install a new rubber check valve with screws or clamps if necessary, then reassemble the piping connected to your pump and turn on the electricity again.
With careful attention paid to each step along the way, replacing a foot valve in your deep well can be accomplished easily and quickly.
Credit: inspectapedia.com
Can a Well Pump Check Valve Get Stuck Closed?
Yes, a well pump check valve can get stuck closed. This can lead to several problems including:
* Low water pressure or no water at all coming from the faucets
* The pump cycling on and off too frequently
* Water hammer when the pump cycles back on again. To prevent this issue from occurring, have your well system serviced regularly to ensure the valves are in proper working condition.
How Do You Test a Well Pump Check Valve?
To test a well pump check valve, the steps include:
* Shut off the power to the pump.
* Remove the discharge pipe from the check valve.
* Connect a hose of water to one end of it and open up its other end.
* Turn on the power, let water out until air is observed coming out.
* Shut down power, reconnect pipes properly and turn on again.
This process confirms whether or not there is an issue with your pump’s check valve by detecting any backflow in pressure that would be caused by defective parts.
How Do I Know If My Well Check Valve is Bad?
To determine if your well check valve is bad, you can perform several tests.• Look for signs of wear or damage on the outside of the valve.
• Listen for any unusual noises such as hissing or bubbling coming from the system when it’s not in use.
• Inspect all piping and connections to ensure there are no leaks present.
• Test water pressure with a gauge to see if it is lower than normal levels.
If any of these tests indicate that your check valve may be faulty, then it should be replaced immediately by a professional plumber to prevent further damage to your system.
Can You Clean a Check Valve?
Yes, you can clean a check valve. To do so:
• Disassemble the valve and inspect for any debris or contaminants.
• Rinse all components with warm water and mild soap using a soft brush to remove dirt buildup.
• Reassemble the valve and test for proper operation.
Maintaining your check valves regularly will ensure they operate correctly over time and reduce potential problems down the line.
Conclusion
This blog post has provided a thorough overview of how to unstick a well check valve. It’s important to remember that even with the best intentions, attempting DIY repairs can be dangerous and it may be better to leave any complicated repairs to an experienced professional. If you follow the steps outlined in this article, however, you should be able to safely and effectively unstick your well check valve if necessary.
