Picture this: it’s a Saturday afternoon, and you’re in the midst of a DIY home improvement project. You’re determined to fix your malfunctioning toilet, but you hit a roadblock when you realize the bolts holding the toilet are rusted and won’t budge.
It’s a frustrating situation, but there’s a solution: breaking the toilet flange cap to gain access to the bolts. However, this may seem daunting if you’ve never done it before. That’s where we come in.
In this comprehensive guide, we’ll provide all the information you need to safely and effectively break a toilet flange cap safely and effectively. We’ll cover the tools you’ll need, the steps to take, and even offer tips on what to do if your toilet flange keeps breaking. So grab your wrench and let’s get started!
When should you Break Toilet Flange Cap
Rusty Bolts
According to a survey conducted by Plumbing Manufacturers International (PMI), rusted bolts are a common issue faced by homeowners when repairing or replacing their toilets. In fact, approximately 30% of toilet repair calls are related to corroded bolts.
Damaged Flange
A damaged toilet flange is a serious problem that can lead to leaks and structural damage. The most common cause of a damaged flange is improper installation, with over 80% of all flange failures being attributed to incorrect installation.
Resealing
If you’re resealing your toilet, removing the toilet and cleaning the flange thoroughly to prevent leaks is important. According to the Environmental Protection Agency (EPA), a leaking toilet can waste up to 200 gallons of water per day, resulting in higher water bills and environmental damage.
Remodeling
If you’re remodeling your bathroom, you may need to break the toilet flange cap to replace the flooring or move the toilet to a new location. According to a survey by the National Association of Home Builders (NAHB), bathroom remodeling is the second most popular home renovation project, with over 80% of homeowners undertaking a bathroom renovation at some point.
Upgrading to a Low-Flow Toilet
Upgrading to a low-flow toilet can save you money on your water bill and help protect the environment. According to the EPA, a low-flow toilet can save up to 16,500 gallons of water per year. However, to install a new toilet, you’ll need to break the toilet flange cap to remove the old toilet and install the new one.
Age of Toilet Flange
Over time, toilet flanges can become brittle and break due to age. According to experts, the average lifespan of a toilet flange is around 50 years. If your toilet flange is older than that, it may be more susceptible to breaking.
Incorrect Installation
If the toilet flange was not installed correctly, it may be more likely to break. A study found that over 20% of toilet flange installations are done incorrectly, which can lead to various problems, including flange breakage.
Excessive Weight
If too much weight is placed on the toilet, it can cause the flange to crack or break. This can happen in households where heavy individuals or those who frequently use the toilet are present. A standard toilet is designed to support up to 1000 pounds, but anything beyond that can put stress on the flange.
How to Break Toilet Flange Cap
Step 1: Gather the necessary tools and safety equipment
Before you start breaking the toilet flange cap, gathering all the necessary tools and safety equipment is essential. This step is crucial to ensure that you have everything you need and avoid any potential accidents.
Process:
- Wear appropriate safety gear, such as gloves and eye protection, to protect yourself from any debris or sharp edges.
- Gather the necessary tools, including a hammer, chisel, pliers, screwdriver, and a putty knife.
- Prepare a bucket or container to catch any water or debris that may come out during the process.
- Turn off the water supply to the toilet and flush the toilet to empty the tank.
- Disconnect the water supply line from the toilet.
Safety Measurements:
- Wear gloves and eye protection to avoid any injuries.
- Turn off the water supply to the toilet to prevent any water damage.
- Prepare a bucket or container to catch any water or debris that may come out during the process.
Step 2: Turn off the water supply
Before you start breaking the toilet flange cap, you need to turn off the water supply to the toilet.
Process:
- Locate the water shut-off valve: The valve is usually located near the bottom of the toilet tank or on the wall behind the toilet.
- Turn off the water supply: Rotate the valve clockwise until it stops. This will shut off the water supply to the toilet.
- Flush the toilet: Once the water supply is off, flush the toilet to drain as much water as possible from the tank and bowl.
- Remove remaining water: Use a plunger or sponge to remove any remaining water from the bowl or tank.
- Check for leaks: After turning off the water supply, check for any leaks in the shut-off valve or supply line.
Safety measurements:
Wear rubber gloves and safety goggles to protect yourself from any water or debris that may come out while turning off the water supply.
Make sure to turn off the water supply completely to prevent any potential leaks or water damage.
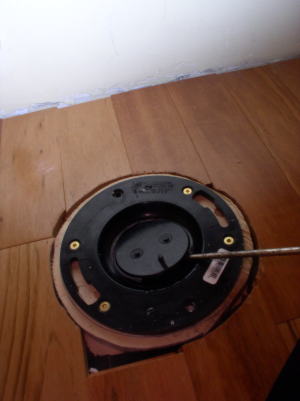
Step 3: Remove the toilet
Once you’ve turned off the water supply, it’s time to remove the toilet. Here’s how to do it:
- Disconnect the water supply – Use a wrench to disconnect the water supply line from the bottom of the toilet tank.
- Remove the bolts – Use a wrench or pliers to remove the nuts and bolts that hold the toilet in place. Keep the nuts and bolts in a safe place as you’ll need them later.
- Lift the toilet – Lift the toilet straight up to detach it from the wax seal on the flange. If the toilet is heavy, ask for help to avoid injury.
- Move the toilet – Once you’ve lifted the toilet, place it on a tarp or old towel to avoid scratching the floor.
- Block the drainpipe – To prevent sewer gases from entering your home, stuff a rag into the drainpipe to block it.
Safety measures: Be sure to wear gloves and safety glasses when handling the toilet to protect your hands and eyes from germs and debris. Always lift with your legs, not your back, to avoid back strain.
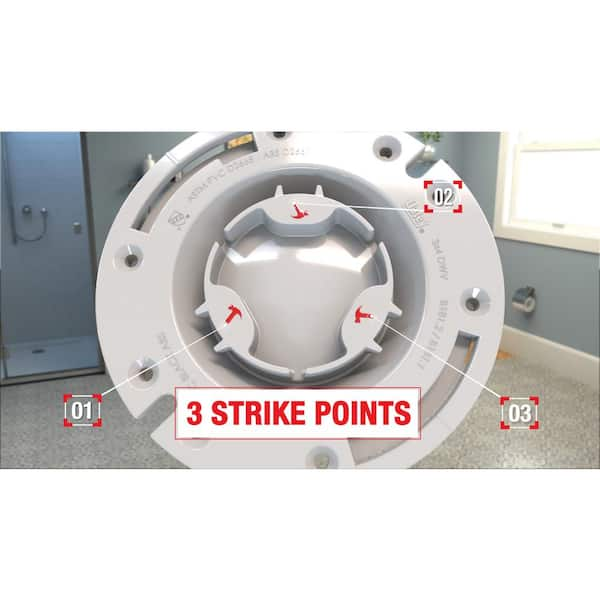
Step 4: Break the toilet flange cap
Now that the toilet is removed, you can break the toilet flange cap. Here’s how to do it:
- Locate the cap – The toilet flange cap is located in the center of the flange and covers the top of the flange.
- Break the cap – Use a hammer and chisel or screwdriver to break the cap into several pieces. Be careful not to damage the flange or the subfloor.
- Remove the cap pieces – Use pliers or a small pry bar to remove the broken pieces of the cap from the flange.
- Clean the flange – Use a putty knife or scraper to remove any remaining pieces of the old wax ring or debris from the flange.
- Inspect the flange – Check the flange for any signs of damage or corrosion. If it’s damaged, you’ll need to replace it.
Safety measures: Wear safety glasses and gloves when breaking the cap to protect your hands and eyes from flying debris. Be careful not to damage the flange or the subfloor when breaking the cap.
Step 5: Install a new toilet flange
After breaking the cap and inspecting the flange, it’s time to install a new toilet flange. Here’s how to do it:
- Choose the right flange – Make sure you choose a flange that matches the size and shape of your toilet drainpipe.
- Install the new flange – Slide the new flange over the drainpipe and secure it in place with screws or bolts.
- Attach the wax ring – Place a new wax ring on the flange, making sure it’s centered over the drainpipe.
- Reinstall the toilet – Carefully lower the toilet back onto the wax ring and align it with the bolts. Gently press down on the toilet to compress the wax ring and create a seal.
- Reattach the bolts – Reattach the nuts and bolts to secure the toilet to the flange. Tighten them evenly to avoid cracking the toilet.
Safety measures: Make sure the new flange is securely in place before reinstalling the toilet. Tighten the nuts and bolts evenly to avoid damaging the toilet or the flange. Always wear gloves and safety glasses when handling the toilet to protect your hands and eyes from germs and debris.
Step 6: Break the toilet flange cap
With the water supply turned off and the toilet removed, it’s time to break the toilet flange cap. This step involves breaking the cap to gain access to the bolts holding the toilet flange in place.
Process:
- Identify the location of the flange cap. It’s usually located in the center of the flange.
- Use a chisel and hammer to break the cap. Place the chisel on the edge of the cap and tap it lightly with the hammer. Work your way around the cap until it breaks off.
- Use pliers to remove the remaining pieces of the cap.
- Use a flathead screwdriver to remove any screws or bolts holding the cap in place.
- Clean the area around the flange and remove any debris.
Safety Measurements: Wear safety glasses and gloves when breaking the cap to protect your eyes and hands from flying debris.
Step 7: Remove the toilet flange
With the cap removed, it’s time to remove the toilet flange.
Process:
- Use a wrench to remove the nuts and bolts holding the flange in place.
- Remove the flange and any remaining debris.
- Clean the area around the flange and remove any debris.
- Check the condition of the sewer line. If it’s damaged or clogged, call a plumber to fix it.
- Install a new flange if necessary.
Safety Measurements: Be careful when using the wrench to remove the nuts and bolts, and avoid damaging the sewer line. Wear gloves when handling any debris.
How to break OATEY toilet flange cap
- Gather the necessary tools and safety equipment, including a hammer, chisel, pliers, goggles, and gloves.
- Turn off the water supply to the toilet to avoid any leaks or spills.
- Remove the toilet from the flange by unscrewing the bolts and lifting them off the floor.
- Locate the flange cap, which is a plastic or metal disc covering the flange.
- Use a hammer and chisel to score the edges of the cap, creating an indentation to break it off.
- Carefully break the cap into pieces using the chisel and hammer until it is fully removed.
- Clean any debris from the flange and prepare it for a new flange or repair.
- Reinstall the toilet onto the new or repaired flange and securely fasten it with new bolts and nuts.
What causes a toilet flange to break
Here are 5 possible causes of a toilet flange breaking:
Age and wear
Toilet flanges can break down over time due to age and normal wear and tear. The materials used to make the flange, such as PVC or cast iron, may weaken or crack over time, leading to failure.
Incorrect installation
If a flange is not installed correctly, it may be more prone to breaking. For example, if the flange is not secured to the floor or is not level, it may be more likely to fail.
Excessive weight
Flanges can break if they are subjected to excessive weight. This can occur if someone stands on the toilet or if the toilet is excessively heavy.
Corrosion
Corrosion can occur if the flange is exposed to moisture over a long period of time. This can weaken the flange and make it more prone to breaking.
Improper use of tools
If the wrong tools are used to install or remove a toilet, the flange can become damaged or broken. For example, if too much force is used to remove rusted bolts, it can damage the flange.
What to do if the toilet flange keeps breaking
If your toilet flange keeps breaking, it can be a frustrating and recurring problem that requires immediate attention. There are several reasons why a toilet flange can continue to break, including improper installation, using the wrong materials, or excessive wear and tear over time.
One solution is to replace the flange with a stronger and more durable material, such as a stainless steel or PVC flange. It’s also essential to ensure that the flange is installed correctly and securely to prevent any future issues.
Additionally, regularly checking for signs of wear and tear, such as cracks or corrosion, can help identify and address any potential problems before they escalate.
If the issue persists, it’s best to contact a professional plumber who can assess the situation and recommend the best course of action. Ignoring the problem can lead to more significant and costly repairs down the road, so it’s crucial to address it as soon as possible.
By taking proactive steps to maintain and repair your toilet flange, you can ensure that your bathroom plumbing system is functioning correctly and avoid any potential disruptions or inconveniences.
FAQ
Is it possible to repair a broken toilet flange?
In some cases, it may be possible to repair a broken toilet flange using a repair plate or epoxy. However, this is not always a long-term solution, and it is often more effective to replace the flange altogether.
How do I know if my toilet flange is broken?
There are several signs that may indicate a broken toilet flange, including a wobbly or unstable toilet, water leaking from the base of the toilet, or a foul odor coming from the toilet bowl.
Can a broken toilet flange cause a leak?
Yes, a broken toilet flange can cause water to leak from the base of the toilet, which can lead to water damage and other plumbing issues.
What causes a toilet flange to break?
Toilet flanges can break for a variety of reasons, including age and wear, improper installation, and damage from heavy objects or other impacts.
Can I replace a toilet flange myself?
While it is possible to replace a toilet flange yourself, it can be a challenging DIY project, especially if you have the limited plumbing experience. If you are not confident in your ability to replace a toilet flange, it is best to hire a professional plumber.
How long does it take to replace a toilet flange?
The time it takes to replace a toilet flange can vary depending on the complexity of the job and the experience of the plumber. In general, it can take anywhere from a few hours to a full day to replace a toilet flange.
How much does it cost to replace a toilet flange?
The cost of replacing a toilet flange can vary depending on a number of factors, including the location of the flange, the type of materials used, and the complexity of the job. In general, you can expect to pay anywhere from $150 to $500 or more to replace a toilet flange.
Toilet flange test plate removal
- Use a screwdriver to pry off the toilet flange cap
- Use a hammer to tap the center of the flange until it breaks
- Remove any remaining pieces of the flange with pliers or a utility knife
Pvc Toilet Flange Cap Removal
If you’re in the process of removing a PVC toilet flange cap, there are a few things you need to know. First, use a putty knife or other flat object to pry the cap off. You may need to use some force, but be careful not to damage the flange itself.
Once the cap is removed, take a look at the screws that held it in place. In most cases, you’ll be able to remove them with a screwdriver. If they’re stuck or stripped, however, you may need to use a drill to get them out.
With the screws removed, the flange should come right off. If it’s stubborn, try using a wrench or pliers to loosen it up before trying to pull it off by hand. Finally, clean off any old caulk or sealant from around the edge of the flange before installing your new one.
Oatey Toilet Flange Cap Removal
If you’re in the process of removing an Oatey toilet flange cap, there are a few things you’ll need to keep in mind. First, use a putty knife or screwdriver to remove the screws that hold the cap in place. Next, use a hammer and chisel to loosen the old caulk around the edge of the flange.
Finally, pry the cap off with a flathead screwdriver. With these simple steps, you’ll have your Oatey toilet flange cap removed in no time!
Permanent Toilet Flange Cap
If your home is anything like ours, the toilet is one of the most-used fixtures. So it’s no wonder that over time, the flange—the part of the toilet that connects to the sewer line—can become worn down or damaged. And when that happens, you’ll need to replace it with a new one.
But what if you want a more permanent solution? That’s where a permanent toilet flange cap comes in!A permanent toilet flange cap is just what it sounds like: a cap that covers the entire flange, creating a barrier between the sewer line and your bathroom.
This type of cap is made from durable materials like PVC or stainless steel, so it won’t corrode or deteriorate over time. Plus, it’s easy to install—simply place it over the existing flange and secure it in place with screws.If you’re looking for a way to extend the life of your toilet flange (and avoid having to replace it anytime soon), a permanent toilet flange cap is a great option!
Temporary Toilet Flange Cap
If you’re in the middle of a bathroom remodel, or even if you’re just doing some routine maintenance, you may need to cap off your toilet flange. A toilet flange is the connection between your toilet and the sewer line, and it’s important to have a secure seal there to prevent leaks. A temporary toilet flange cap can be a great way to make sure that your flange is sealed while you’re working on it.
There are a few different types of temporary toilet flange caps available. One type is simply a rubber cap that fits over the top of the flange. This type of cap will work fine as long as there’s no water pressure behind it (like from a shower or tub).
If there is water pressure, though, this type of cap can be blown off easily.Another type of temporary toilet flange cap has a stainless steel ring around the outside edge. This ring helps hold the cap in place, even under water pressure.
These types of caps are more expensive than the rubber ones, but they’re worth it if you need a reliable seal.Once you’ve selected the right type of temporary toilet flange cap for your needs, simply put it in place and screw it down tight. Make sure that you don’t overtighten it, though, as this can damage the threads on your flange.
Now your flange should be securely capped off and protected from any leaks until you’re ready to reconnect everything permanently!
Tko Toilet Flange Cap Removal
If your toilet is leaking, you may need to remove the flange cap in order to access the flange and make repairs. The process for removing a toilet flange cap varies depending on the type of cap you have, but it is generally a simple process that can be completed in a few minutes.Toilet flange caps are usually made of plastic or metal, and they are screwed onto the top of the flange in order to seal it.
If your toilet is leaking, you will likely need to remove the cap in order to access the flange and make repairs. There are two main types of toilet flange caps: screw-on caps and snap-on caps.Screw-on caps are the most common type of toilet flange cap, and they can be removed using a screwdriver.
Simply unscrew the screws that hold the cap in place, and then lift off the cap. If your screw-on cap is stuck, you may need to use a pair of pliers or an Allen wrench to loosen it before you can unscrew it by hand.Snap-on caps are less common than screw-on caps, but they can still be found on some toilets.
These caps snap into place on top of the flange, and they can be removed by gently prying them up with a flathead screwdriver or another tool. Once you have pried up one side of the snap-on cap, you should be able to easily pull it off of the flange.
Credit: myoldworkshop.com
How Do You Break the Seal on a Toilet Flange?
If your toilet flange is broken, you’ll need to replace it. To do this, you’ll first need to break the seal on the old flange. This can be done by using a chisel and hammer.
First, use the chisel to score the seal around the edge of the flange. Next, use the hammer to tap on the chisel until the seal is broken. Once the seal is broken, you should be able to remove the old flange easily.
How Do You Remove a Test Cap from a Toilet Flange?
If you need to remove a test cap from a toilet flange, the first thing you’ll need to do is turn off the water supply to the toilet. Once the water is shut off, flush the toilet to empty the tank. Then, use a plunger to try and dislodge the cap.
If that doesn’t work, you may need to use a screwdriver or other tool to pry it off. Be careful not to damage the flange when doing this.
How Does a Toilet Flange Break?
A toilet flange break can occur for a few reasons. The most common reason is because of the weight of the toilet itself. Over time, the flange can become weakened and eventually snap under the pressure.
Another reason for a flange break is if there is any type of movement in the floor around the toilet. This can cause stress on the flange and cause it to eventually break. Finally, if the bolts that hold the flange in place are not tight enough, this can also cause the flange to break.
How Do You Remove Pvc Test Caps?
Assuming you are talking about the common type of test cap used on PVC pipes, the following steps should be followed:1. Unscrew the cap from the pipe. This can be done by hand or with a wrench, depending on how tight the cap is.
2. Once the cap is removed, inspect the inside of the pipe for any debris that may have accumulated over time. Use a brush or other object to remove any foreign objects from inside the pipe.3. Rinse out the interior of the pipe with clean water to remove any remaining debris before screwing on a new test cap.
Conclusion
In conclusion, knowing how to break a toilet flange cap can be a useful skill for any homeowner or DIY plumber. It’s important to follow safety precautions and gather the necessary tools before starting the process. Rusty bolts, damaged flanges, and resealing are some common scenarios where breaking the cap is necessary.
However, it’s also important to understand the causes of a broken toilet flange and how to prevent it from happening repeatedly. With the right knowledge and tools, you can successfully break a toilet flange cap and complete your plumbing tasks with ease.